This is the electrical wiring FAQ page, tailored towards the experimental kit-builder who is building their own aircraft. Of course it goes without saying that this information is for you to use at your own risk. We certainly do our best to provide you with wise information. Feel free to contact us with further questions, any time something good gets asked, we add it to this page, furthering the knowledge base of the internet!
If you have come here from a search engine, you may not be aware of our free electrical wiring tutorial videos, so be sure you check those out. Most of the tools on this page will have some sort of a video associated with them. Click here to return to the electrical school.
Where do I get the proper crimp tools for wiring my aircraft?
We recommend, above all, matching the tooling with whatever connectors and terminals you are using. A majority of the components you will be using in your aircraft are likely manufactured by AMP, which is a product line from the electronic component giant, Tyco Electronics. Start by going to the Tyco Electronics on-line tooling store at tools.tycoelectronics.com. It's important to keep in mind that one of your hardest jobs in wiring your avionics, your instrument panel, or your airframe is sourcing components! Finding the right components really is a full time job. Some components you'll be looking for are listed below. We will gladly sell you these tools, or you can contact Tyco Electronics or Mouser.com and order these directly.
Keep in mind the ergonomic benefit of properly-designed tools. Not only will they usually fit in closer spaces than the average tool, they are easier on your hands. The two crimp tool frames below for example (the Pro-Crimper and its cheap version) can both accept the high quality dies. The difference in the Pro-Crimper version is the addition of more adjustability in crimp depth and a much improved angle to the tool for easier usage.
NOTE: Do not order one of each of what you see below. There are duplicate tools listed, in many cases the cheaper tool is listed as well as the preferred tool. If you have any questions, let us know. We'll upgrade the list by including pictures and splitting it into "cheap" and "expensive" in the future.
CRIMP TOOL FRAMES
$75.00 mouser.com 354940-1 Pro-Crimper II frame, nice quality
$27.81 tools.tycoelectronics.com 1490496-1 cheap crimp tool frame
PIDG TOOLING {videos available!}
$45.00 mouser.com 58423-1 PIDG crimp die, nice quality
$15.45 tools.tycoelectronics.com 1583108-1 cheap PIDG die
$100.94 tools.tycoelectronics.com 55823-1 pro-crimper II with PIDG die
COAX TOOLING
$103.95 tools.tycoelectronics.com 220189-3 military "O" crimp dies
$38.85 tools.tycoelectronics.com 58436-1 hex crimp dies
$30.90 tools.tycoelectronics.com 1490496-X cheap crimp tool with PIDG die or with coax die (coax -3, PIDG -2)
$15.45 tools.tycoelectronics.com 1583108-2 cheap coax die
$71.07 tools.tycoelectronics.com 603995-5 coax strip tool
D-SUB AND CPC TOOLING {videos available!}
$31.00 steinair.com SAT-004 d-sub pin crimp tool (also at bandc.biz RCT-3 for $44)
$24.72 tools.tycoelectronics.com 1490492-1 DO NOT USE 4-way indent tool for CPC Series II
$245.00 dmctools.com AFM8-K13-1 Daniels milspec indent crimp tool with positioner
$5.17 dmctools.com 81969/1-02 insert/extract tool for standard density contacts (also at Stein Air for $4, p/n SAT-023)
$34.51 dmctools.com K42 positioner for Daniels tool for high density contacts
$5.17 dmctools.com 81969/1-04 insert/extract tool for high-density contacts
SOLDERING TOOLS AND CONSUMABLES {videos available!}
$52.67 mouser.com 578-WLC100 Weller solder station, 40W
$5.06 mouser.com 578-ST-6 fine solder tip .03"
$25.71 mouser.com 801-DP-200 high vac ESD safe de-solder tool
[DISCONTINUED] $14.14 mouser.com 533-24-6040-8800 solder, "no-clean" flux core 60/40 alloy, 1lb, 1.1%
$23.90 mouser.com 533-24-6337-8800 solder, "no-clean" flux core 63/37 alloy, 1lb, 1.1%
BASIC TOOLS {videos available!}
$224.00 cms-tools.com 55-1987 Ideal Ergo Elite wire stripper, one of the best available, 26-16
$205.00 cms-tools.com 45-1987 Ideal Custom Stripmaster, nice strip tool - 26-16
$34.25 cms-tools.com 45-097 Ideal Stripmaster, cheap strip tool, 26-16 gauge (also at steinair.com)
$10.99 sears.com 11046 Klein basic wire stripper 16-26 gauge (you need this even with an automatic stripper)
$10.99 sears.com 11045 Klein basic wire stripper 10-18 gauge (nice to have)
$19.99 sears.com 45673 Craftsman 3-piece plier set
$5.22 mouser.com 548-285 alligator clip leads, mini
$5.22 mouser.com 548-287 alligator clip leads, standard
$25.00 hardware store HEAT-GUN heat gun
$29.99 www.radioshack.com 22-813 voltmeter
$12.99 www.radioshack.com 64-2991 3rd hand tool
$15.00 hardware store TOOL-BOX plastic tool box
$2.00 hardware store RAZOR-BLADE razor blades
MOLEX TOOLING {video available!}
$38.36 mouser.com 538-63811-1000 Molex hand crimp tool
$18.17 mouser.com 538-11-03-0006 .093 extraction tool
$18.17 mouser.com 538-11-03-0002 .062 extraction tool
BATTERY CABLE TOOLING AND MATERIALS {video available!}
$59.99 westmarine.com 214080 Ancor Marine, CrimpAce hammer crimping tool Instruction Sheet
$54.99 westmarine.com 401679 Ancor Marine, heavy cable cutter
$19.99 westmarine.com 3253259 Ancor Marine, heavy cable stripper
$10.00 westmarine.com Ancor Marine fine-strand battery cable, price per foot
$1.50 westmarine.com Ancor Marine heavy-duty battery cable lugs, price each
CONSUMABLES, MATERIALS
$5.87 mouser.com (or mcmaster.com) 5174-348316 heatshrink, 3:1 polyolefin, adhesive lined. example given: 4' piece of 3/16 diameter.
$2.00 mcmaster.com 7130K52 tie-wraps. Example part number is 4" tie-wraps, 18 lb tensile, package 100
$5.00 mcmaster.com 7134K51 releasable tie-wraps, pkg. of 50
$0.33 steinair.com or gen-aircraft-hardware.com MW-22759/16 milspec Ttefzel wire, single strand, colors, priced by foot
$1.00 steinair.com or gen-aircraft-hardware.com MW-27500 milspec shielded wire, various part numbers, priced by foot
I was looking again at the materials you provided and don't find a source for rocker switches. My original plans were to use the B&C Specialty toggles, but I've always wanted to explore that option further before making a final decision.
You might look at getting rocker switches from Lancair. Their online store’s rocker-switch section is: http://www.aerocraftparts.com/Categories.aspx?Category=38940ec0-b260-4e9f-a23c-b80ff8e89c67
I see they are using Eaton rocker switches. You might use that info to go to an Eaton website and find a full catalog for their rockers. Then see if you can find the part numbers on Mouser, Digikey or Allied electrical. In some cases I prefer rocker switches, in some cases toggle. If I were forced, I would prefer the toggle because on/off is easier to see at a glance, a rocker doesn't move much, and if your vision is blurry and the cockpit on fire, it's easier to work with toggles. The best is to use a mixture of switches with different tactile feel so that you can tell them apart. Of course, mixing switch types can make an ugly panel real quick if things aren't chosen wisely.
A specific question about tools, what kind of wire stripper do you recommend?
One of the best wire strippers available is the Ideal Custom Stripmaster. This tool is available with machined dies that accurately strip MIL-W-22759 wire without digging into the individual strands. 22759/16 is a 16-strand wire available in many gages. You can use a cheaper strip tool, like Ideal's more common "Stripmaster" (note the lack of the word CUSTOM in front of that). Ideal has a new tool (less than 2 years old) which is an upgrade of the Custom Stripmaster, called the Ideal Ergo Elite. It is a very nice tool which comes with strip dies specifically manufactured to strip milspec wire. This tool is available from a number of sources, the part number is 55-1987 and the cost will be between $150 and $200.
What type of solder should I use? What is flux?
You want to use a 60/40 solder with a no-clean core. The flux core will clean the surface oxides from your workpieces and create a better solder joint. Remember, heat the part and add solder on the opposite side of the workpiece from the iron tip. There are MANY different flux chemistries for all different types of soldering. Research the product you are purchasing and find out if the flux is corrosive. Kester makes a nice solder for general use called "no-clean" and goes by the number 245.
Can I use my handheld GPS in the cockpit if I am flying IFR?
Yes, but you have to be using it as an aid to your pilotage. You can't rely on that handheld to tell you where you are. ANYTHING you do to add to your situational awareness is good. There is no reason not to take it along and use it...just don't forget to use your VOR, NDB or pilotage skills to keep aware of where you are.
What type of heat shrink tubing should I use?
You should be searching for 3:1 shrink ratio polyolefin tubing. It comes in all colors and even comes in varieties with adhesive lining. This type of shrink tubing is much more durable than the average materials. The 3:1 ratio is a huge advantage when working with your aircraft's electrical system. You'll find the extra ability to shrink to come in quite handy in almost all circumstances. Avoid using PVC or any tubing that shrinks only 2:1. The most expensive heat shrink tubing comes in ratios as high as 6:1.
Do I need to use weatherproof connectors in the event of leakage between the seams or will the paint I'll put on it eventually be enough to deter water intrusion?
For the most part, you don't need to worry about weather proof connectors. You'll start spending more money on parts and tools when you get into that and really an airplane isn't in the "weather" much. I am in the process of ordering a bunch of waterproof stuff for a boat project. If you are interested, I'll get you some photos and part numbers.
Speaking of tie wrap mounts, I've seen these self stick ones but I've heard that they can eventually un-stick over the years. Here at our company we stick ours down with Hysol 9309 Epoxy which lasts for years but I'm sure is very expensive. What do you recommend for sticking these down?
Hysol is a great adhesive. You can buy it from Lancair, they use it for structural bonding. I don't know what a quart kit might cost, but I'm guessing around $60. The sticky adhesive tie-wrap mounts that I've seen don't work, just like you have heard from others. I would guess that if you found just the right vendor of a very high quality adhesive stick on mount, you may have a decent product, but I personally don't know who makes the best ones.
When an electrical wire goes through a grommet it is not supposed to touch the sides of the grommet, right? I've seen in the 43.13 a suggestion to put a P-Clamp near a grommet in order to keep the wire from touching the sides. The P-Clamps that I've seen are not equipped to hold a wire bundle within a hole without the need to fabricate another bracket to hold the P-Clamp in the correct orientation. This seems to me to be a lot of work and can add weight. Is there a quicker and easier solution?
A grommet is meant to separate the wire from the structure, so a wire can lay on the grommet. However, you have to use common sense along these lines. You don't want a really loose fit between wire and grommet, or things will move around a lot. Also, if it's a heavy/stiff bundle or wire and the grommet is fragile, the sharp edge of the wing rib (or whatever the structure is) will cut right through a rubber grommet. When the wire is coaxial with the hole, the only way to clamp it down is to use a small piece of angle iron (aluminum actually). Something along the lines of a 1" angle aluminum cut to 1" length. You bolt that against your bulkhead, thus providing now a flat surface to tie the wire to. The flat surface is good then for either an Adel clamp or tie-wrapping the bundle (if it has some additional protection like spiral wrap) directly to the angle. In the tie-wrap case, cut some notches in the angle iron to "capture" the tie wrap. I found exactly the photo I'm looking for, on the Aircrafters web page. I remember this because it is the Glastar I did a majority of the completion work on it. Check out:
http://www.aircraftersllc.com/projects/PeterTGlaStar/PIC00738.jpg
http://www.aircraftersllc.com/projects/PeterTGlaStar/index.htm
Is it acceptable to tie a connector down with a couple of tie wrap mounts and tie wraps?
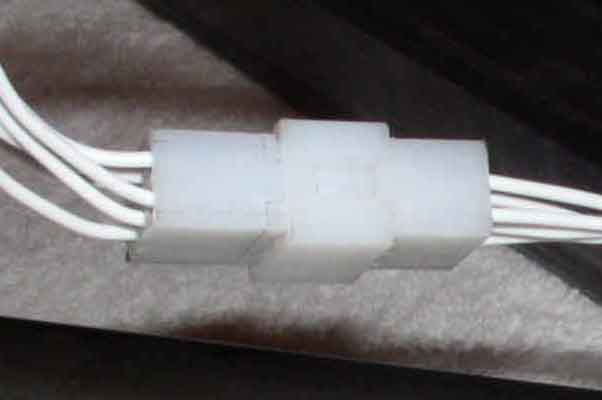
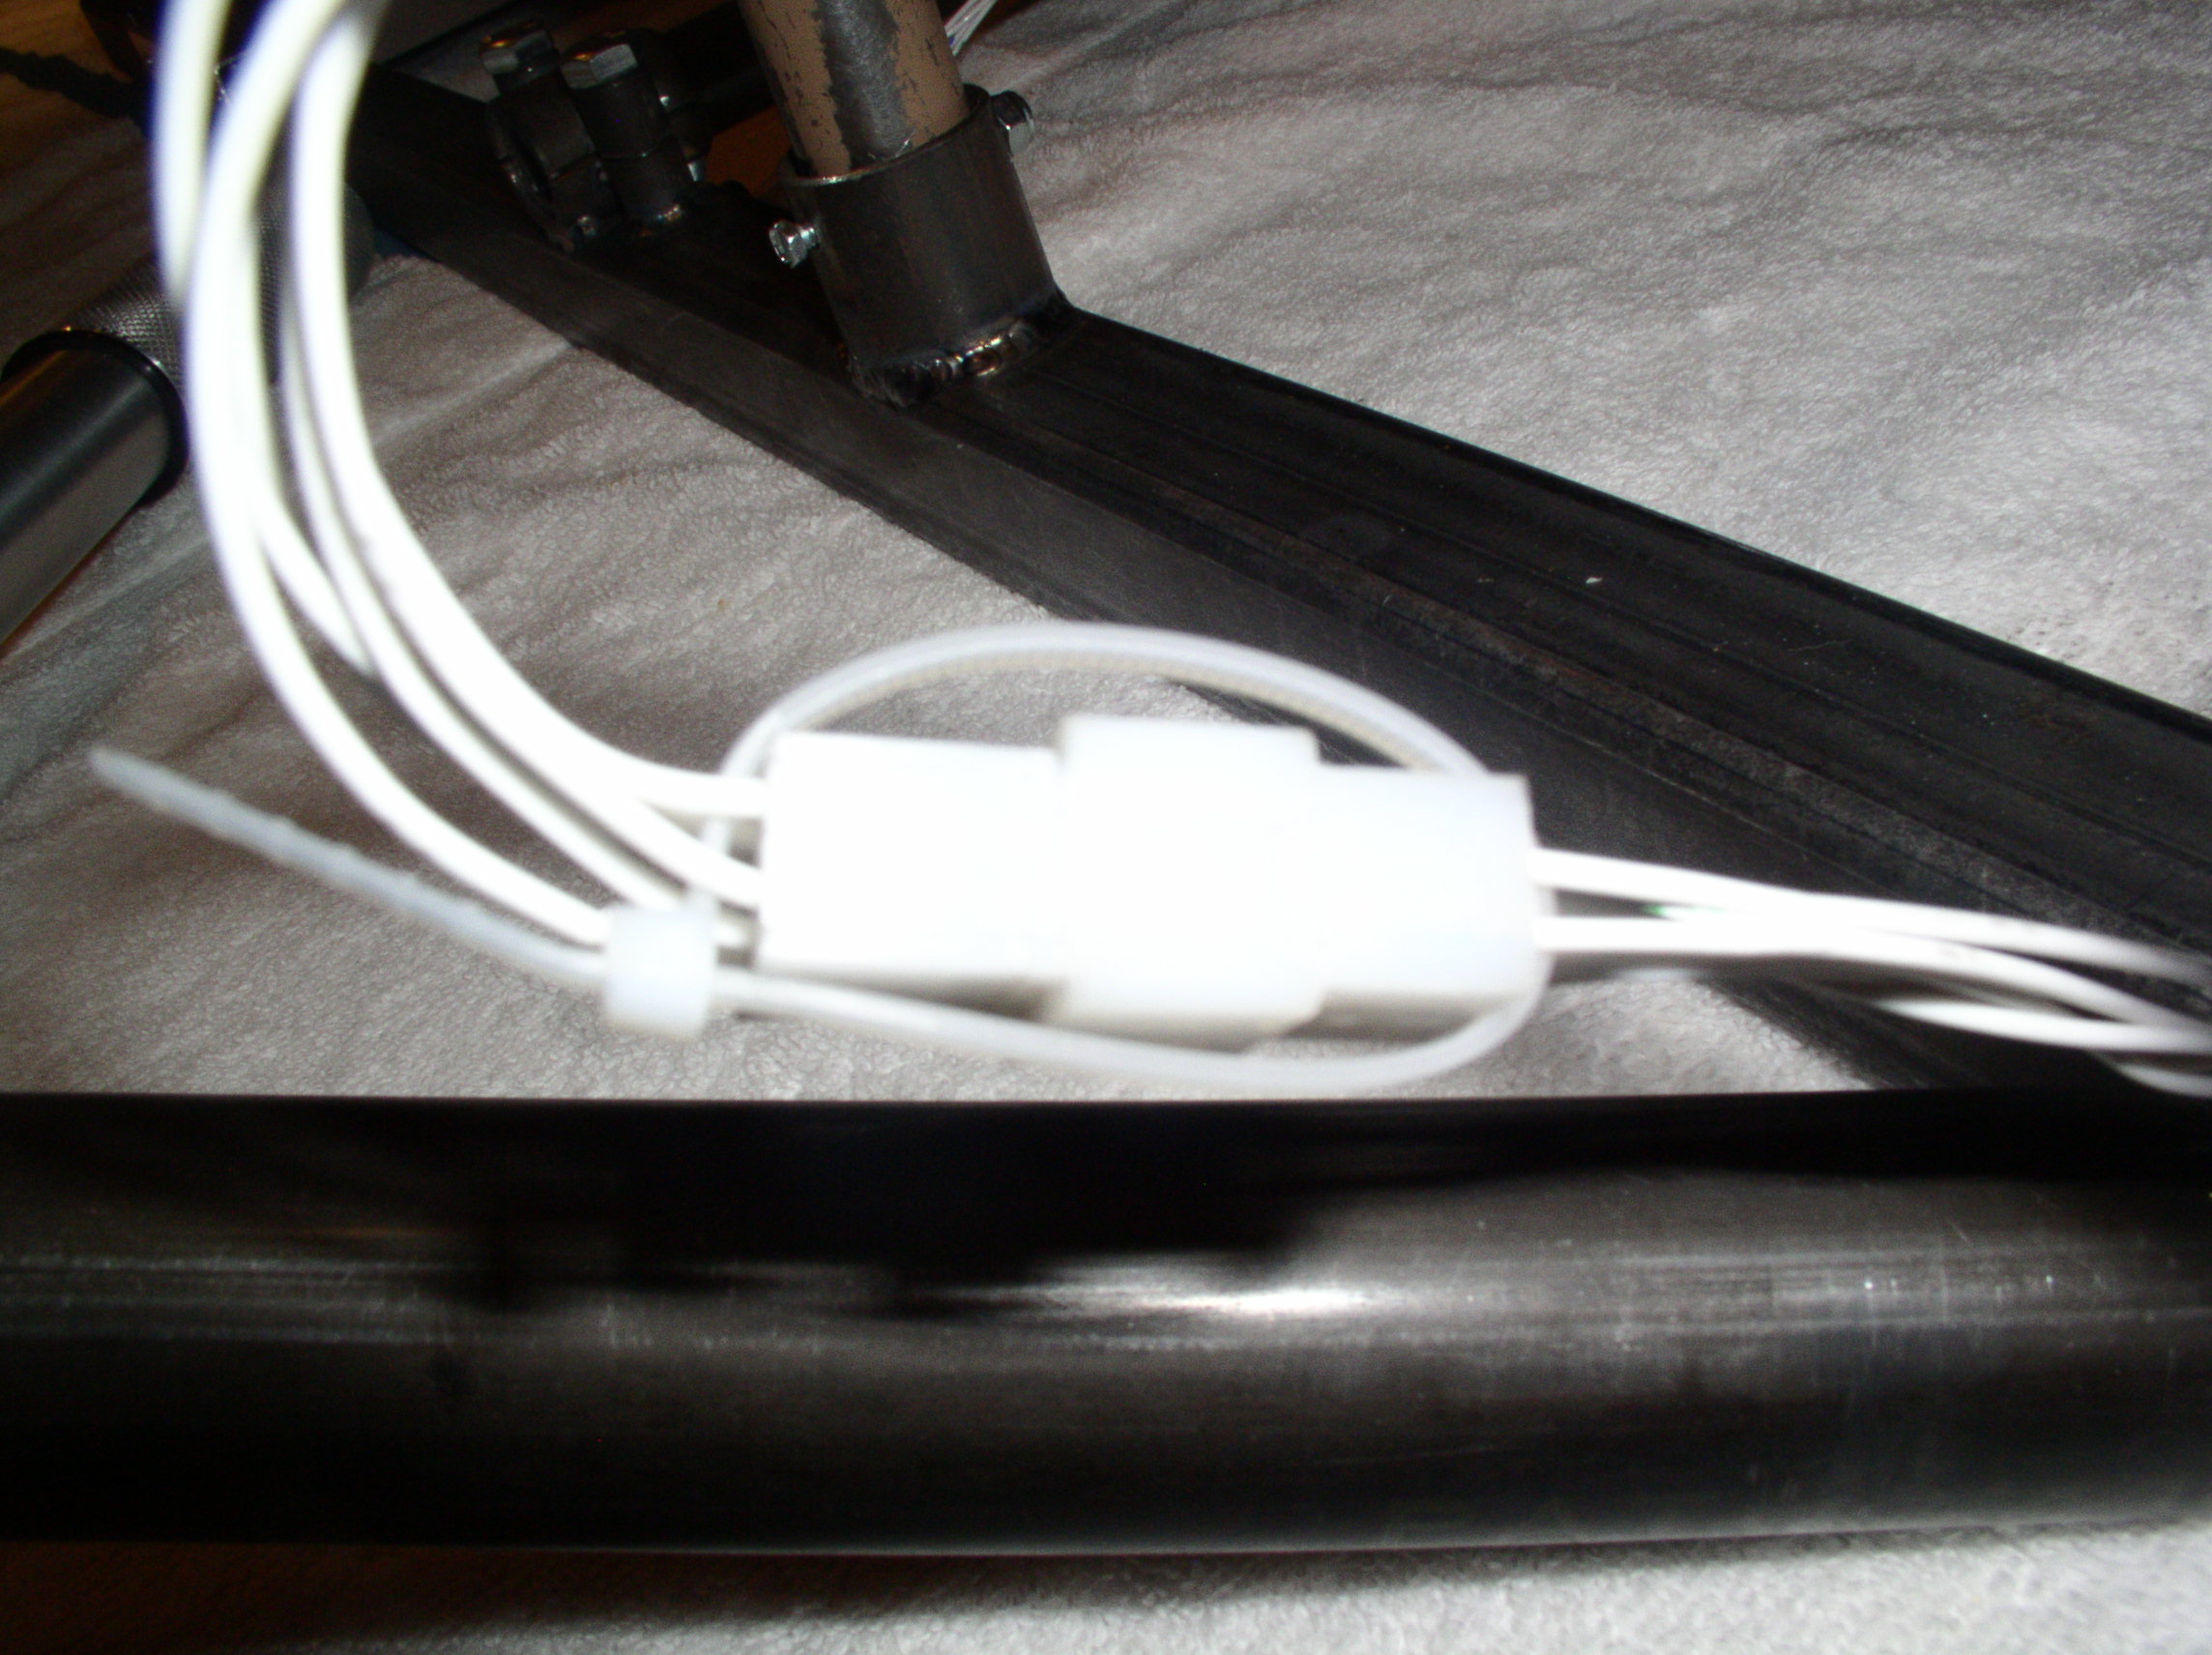
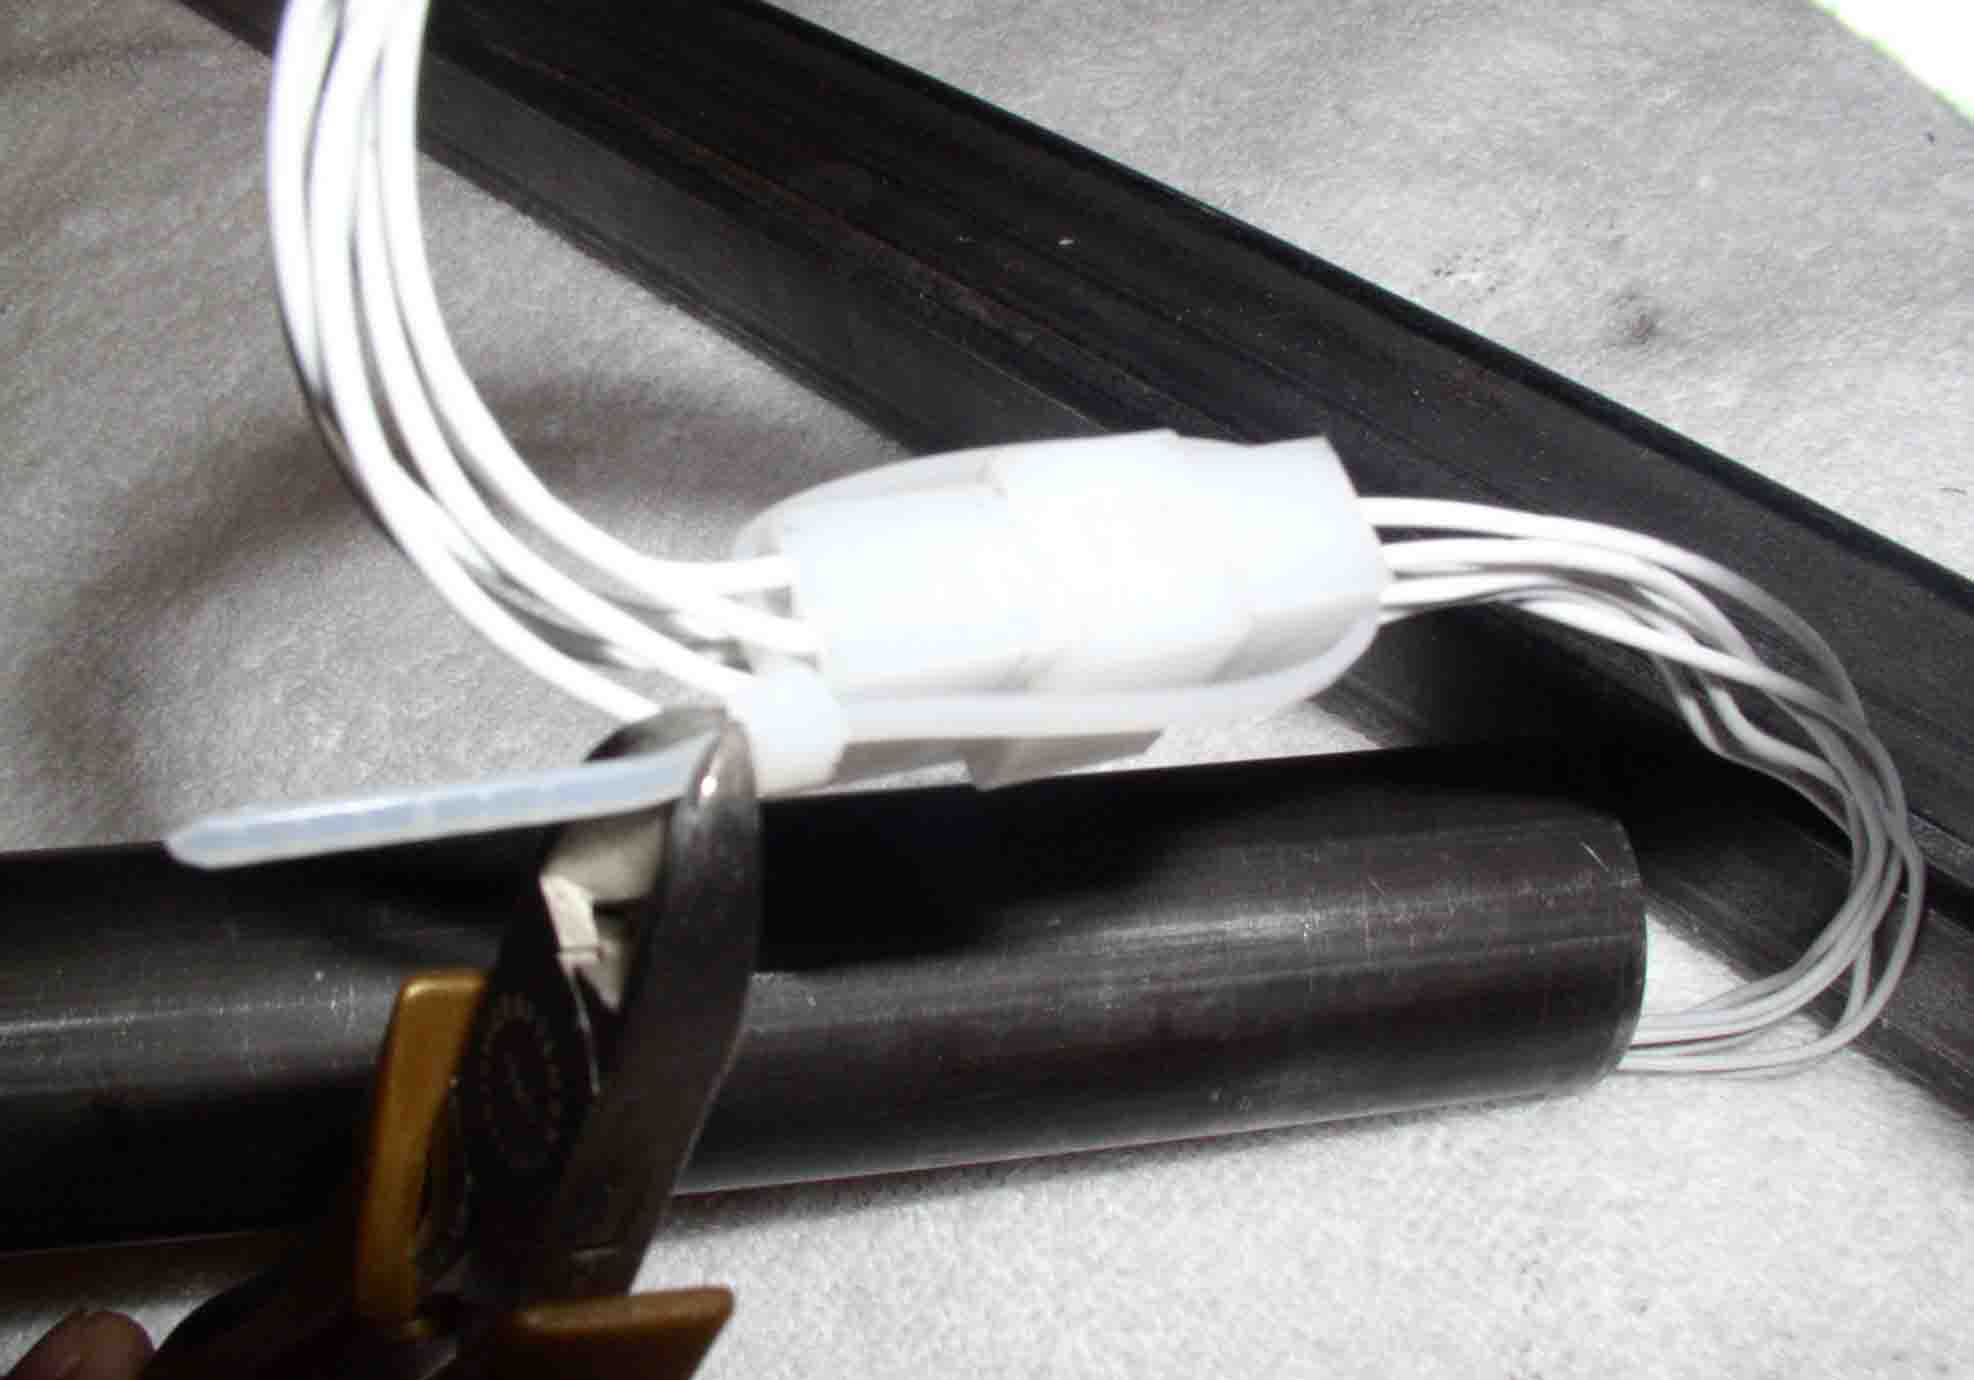
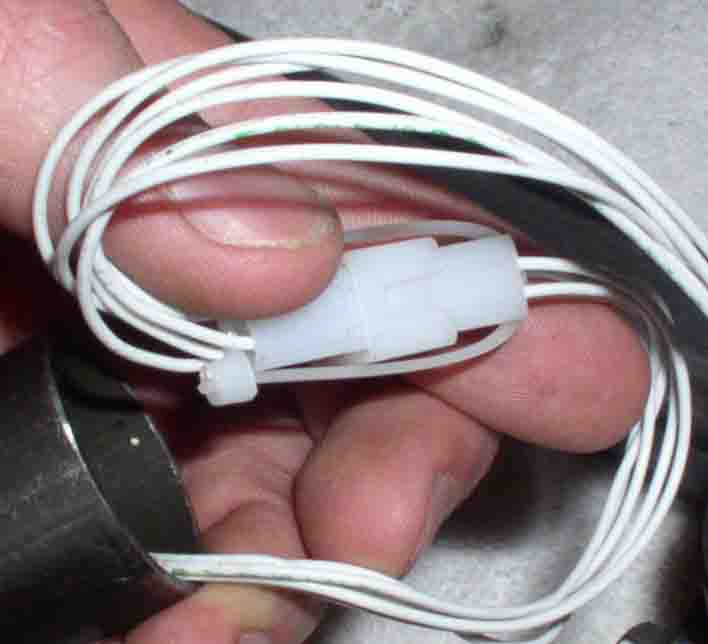
A connector should be free-hanging in the wire harness, provided it is either a circular connector with a locking ring (amp CPC series of connectors) or a square Molex type plug with some tie-wraps around it to hold the connector bodies together. Connectors are naturally the highest stress point of the harness, so be careful about tying them down to structure. If you do attach them, be sure to attach a portion of the harness, along with a bit of stress relief if possible. Here are a few pics of the Molex connector tie-wrap trick. Drag them to your desktop and they will open in a large size.
I attended your electrical class a couple of months ago in Watsonville. I'm building a Van's RV-9A and I'm at the point of starting to wire up my trim tab motor. What are you opinions of using terminal blocks rather than connectors at interfaces that can be removed like elevators? I think running wires with terminal lugs would be a lot easier than trying to route connectors. I read in my old AC 43.13 that there was a concern about the screws working loose which could lead to a loose connection, a hot spot, and fire. I noticed that we used a terminal block in our project. What gives?
I would highly recommend using a connector. The only drawback to a connector is that you may a "bulk" issue with threading the connector body through a hole or tight space. However, you will have that problem with the ring terminals on your bundle as well. If the connector body is limiting you, you can terminate the wires first, thread them through holes as necessary and assemble the wires into the connector after passing through the tight space. I agree about the screw terminals backing out, you will find that those terminal strips can easily come loose if the ring terminal puts any torque on them we do use the barrier strip terminal block for the "panel" project in class, but then again, we also use an automotive fuse holder, a cheap toggle switch and dangerous light bulb holders (that could easily short out). Unfortunately, by providing students with an inexpensive (affordable) way to learn wiring by using these types of components, the possibility exists that we teach them how to use the wrong types of parts. There are many certified aircraft that have terminal blocks and terminal strips. Just like anything, used properly, the screw terminals are indeed a proper solution to certain applications. Now, if you are against the connector body solution and prefer a terminal strip, there is a particular terminal block that you would be best off using. This type of strip has studs that accept your ring terminals and can be secured with a nylon self-locking nut. This would be a very reliable solution for this application. The drawbacks to this are the time required to make the connection and the overall bulk and weight of the terminal strip.
http://www.chiefaircraft.com/cgi-bin/air/hazel.cgi?action=serve&item=/Aircraft/InstallationSupply/TerminalBlocks.html
I found the link above by Google searching:
http://www.google.com/search?hl=en&lr=&q=mil+spec+terminal+block&btnG=Search
If you click on the photo on the Chief Aircraft page, you'll see what I'm thinking of, except that one has 20 studs. I'm envisioning one with 5 studs (I'm guessing your trim has 5 wires...2 for motor and 3 for indicator) you can actually make something similar to save some money. Use nylon or phenolic, counterbore the back side for your post, tighten down a nut on the front side which will stay permanently, and add a second nut to secure your ring terminal to the block. The block would need two additional holes at each end for mounting. They also have covers for these types of terminal blocks too. If you stick with the "cheap" type of block, which accepts screws, you would want to consider perhaps deforming the threads on the screw slightly to provide a mechanical lock. It's not an "aircraft" type of solution, but it is one way to do it. Chances are, the screw, if loose, will not come all the way out before your next inspection.
What is the difference between a potentiometer, varistor, and rheostat?
They are all the same thing, essentially. Along the way, people have come to know the various species of these components by different names. Typically, when you are using the potentiometer to pass through a large current in series with your motor/light/etc., you call it a rheostat. A varistor is simply a VARiable resISTOR. A potentiometer is a coil of resistive wire that has constant resistance between pins/lugs 1 and 3 and pin/lug 2 is a wiper that moves along the coil, thus delivering a variable-resistance functionality. Potentiometers are usually rotary, typically 1 turn, but can come in many forms. They come in multi-turn, linear, logarithmic and other forms. Potentiometers themselves can move linearly or rotationally.
What equipment will I need for IFR and VFR?
Here is a synopsis of what you will need, converted from hard-to-read aviation speak of the Federal Aviation Regulations into something more closely resembling English. You have three levels of equipment: VFR (daytime), VFR (nighttime), IFR (day/night).
§91.205 (b) Visual-flight rules (day)
1) Airspeed indicator
2) Altimeter
3) Magnetic direction indicator
4) Tachometer for each engine
5) Oil pressure gauge for each engine
6) Temperature gauge for each liquid-cooled engine
7) Oil temperature gauge for each air-cooled engine
8) Manifold pressure gauge for each altitude engine
9) Fuel gage indicating the quantity of fuel in each tank
10) Landing gear position indicator
11) Approved aviation red or white anti-collision light system
15) ELT [reference 91.207 for specific requirements]
§91.205 (c) Visual-flight rules (night), additional
2) Approved position lights
3) Approved aviation red or white anti-collision light system
4) If the aircraft is operated for hire, one electric landing light
5) An adequate source of electrical energy for all installed electrical and radio equipment
6) One spare set of fuses, or three spare fuses of each kind required, that are accessible to the pilot in flight
§91.205 (d) Instrument flight rules, additional
2) Two way radio communications system and navigational equipment appropriate to the ground facilities to be used
3) Gyroscopic rate-of-turn indicator [some exceptions apply]
4) Slip-skid indicator
5) Sensitive altimeter adjustable for barometric pressure
6) A clock displaying hours, minutes and seconds with a sweep-second pointer or digital presentation
7) Generator or alternator of adequate capacity
8) Gyroscopic pitch and bank indicator (artificial horizon)
9) Gyroscopic direction indicator (directional gyro or equivalent) [HSI]
What type of connectors should I use?
There are many varieties, but for the most part, you'll use either of two common types: AMP CPC and Molex Pin/Socket. By far the superior connector is the AMP CPC (circular plastic connector). They use gold contacts that are precision machined and precision crimped. They have great strain relief options and are built for many make-break cycles. A Molex type connector is much less dependable, has a limited cycle rating, and has no means of strain relief. Incidentally, there are interchangeable part number series between Molex and AMP for the generic rectangular "pin and socket" connector, so don't assume they can only be made by Molex. Molex simply is the more prevalent manufacturer name for those types.
For the AMP Series II CPC connector assemblies:
**note, use these part numbers to search for other components in the same family!
AMP plugs: 571-2064851
AMP receptacle: 571-2064862
AMP back-shell: 571-2060621
AMP pins/sockets: 571-2050891 and 571-2050901
Extraction tool: 571-910672
Crimp tool: Contact Heli-Chair for assistance, this one can be expensive...
For MOLEX type connector assemblies:
**note, use these part numbers to search for other components in the same family!
.093" pins and sockets: 571-7701471 and 571-7701461
12pin receptacle: 571-7701001
12pin plug: 571-7701021
Crimp tool: 538-63811-1000
Extraction tool: 571-3188371
Where is the best place to order these connectors? Can you help de-mystify the sizing of these connectors for me?
You're best off ordering from Mouser or Digikey. I would say stick with mouser, because they have a better catalog and easier web interface, but i have found price advantages to certain parts from Digikey. To make a long story short, once I find the part numbers I know I want, I'll check on Mouser, Digikey and a third place called Allied Electronics. Depending on quantities, in-state taxes and shipping charges, each company has advantages. Sometimes sticking with one vendor is best because it's simple, and saving $50 here or there might not be worth your extra time.
With regard to Molex connectors, you're going to look for basically two series of connector bodies, the ".062" and the ".093". Those numbers are referring to inch diameters of the pins/sockets. The 062's are good for little stuff like instrument bulbs and trim and the 093's are good for something that needs more mechanical strength or up to maybe 7-10 amps. As for pins, choose the ones that will work with whatever gauge wire you need (typically 18 or 20, but ranging as much as 16-22).
For the amp connectors, you want to use the Series II CPC (circular plastic connector) for most avionics stuff and anything up to wire size 20. The most common connector bodies to buy are the 9 pin and 28 pin. Each has its own strain relief shell.
Often, I'll refer to a place like Edmo, Aircraft Spruce or Aerocraft to see what they are selling. They might have nice pictures and help reinforce your understanding of what to buy. Once you find the part numbers, go to a place like Mouser and buy bulk and save some bucks. More importantly, once you find those key part numbers, go to the manufacturer and look for other parts in the family. This is where Mouser will really be best, because you can most likely order anything in the part family, whereas a more typical aviation supply house only has the "common stuff".
Is there any advantage to using twisted pair wires?
There is definitely an advantage. Physicists figured out long ago that a wire with a current flowing through it created a magnetic field. They also figured out that a magnetic field can induce current to flow in a wire that passes through that magnetic field. By twisting your power and ground leads together, for example, the current flows in opposite directions and the wires cross orthogonally, lessening the effect of the magnetic fields. This is why you often see twisted pairs used in RS-232 or RS-422 digital circuits -- they are very sensitive, and need to have the least amount of noise possible.
What is a quarter-wave antenna? What is a half-wave antenna? Do they emit less power? Are they less efficient?
Nothing is ever perfect. When antennas are designed, the engineers do a very careful job to adjust the length and shape of the antenna elements to receive waves of energy. As you can imagine, waves have a certain wavelength. A half-wave antenna is one half the length of the radio waves it is receiving. There are theoretical losses that can be calculated, but in practice, there is never any better data than talking to the people who make the antennas, researching the topic on their website, or talking to others who have used the products.
What are the legal requirements for IFR and VFR equipment in my aircraft? What official paperwork do I need to do in order to use my GPS in the clouds?
What are your recommendations regarding an ammeter installation?
A keen student pointed out that AeroElectric has sourced and sells load meters (ammeters) matched to alternator capacity and marked in percentages. There are lots of good arguments for things being rated in a percentage, as interpreting the number is far more intuitive. Here is a link to a photo of the loadmeter: https://matronics.com/aeroelectric/Catalog/AEC/9007/9007-120-1_Loadmeter.jpg
How the heck do I use my voltmeter?
Check the video directory for videos on how to use a voltmeter.
Where can I find the modular grounding plugs you showed in class?
Start by taking a look at this link on EDMO, from there you can research and find the part numbers on Tyco's website and eventually find other sources. http://edmo.com/index.php?module=products&func=display&prod_id=14474&cat_id=447
What is a "balun," and why would I want one on my antenna?
First of all, one of the tricky things about a balun is that when a coax is connected to it, if you check the continuity from center pin to ground, you'll think it's a short. Of course, at radio frequencies, this isn't the case. I almost tore apart the tail of a Lancair convinced that the coax had been terminated incorrectly and then the owner mentioned a balun was installed. Now, I'll refer you to an answer provided to me by a reader:
Per Terman, "Electronic and Radio Engineering", copyright 1932 to 1955, page 902.
Balun stands for "balancing unit". A balun can enable you to "use a coaxial transmission line to deliver power to an ungrounded antenna system that is symmetrical with respect to ground.” Terman shows examples including: At low frequencies (wavelength much longer than transmission line) a transformer is used - i.e. two coils in close proximity, typically with a tuning capacitor on each side. At resonant frequencies (wavelength shorter than xmsn line) a balun can be implemented by putting a quarter wavelength sleeve around the end of the coax. If there is an impedance mismatch in a transmission system, power is reflected off the mismatch back up the line and doesn't make it to the antenna. In short, balanced is good, mismatch is bad. For those who haven't heard of Terman, he made the Stanford Electronic Engineering department prominent, including students Hewlett and Packard.
If I use the same radio and have the output go to two antennas, will it work twice as good.